INTRODUCTION
Visual Basic is a programming language that is designed especially for windows programming. This tutorial will step through and demonstrate some of the features of Visual Basic. It will explain most of the tools available for implementing GUI based programs. After introducing the basic facilities and tools provided by Visual Basic, we apply our knowledge to implementing a small VB program. Our program will implement a visual interface for a commonly know “stack” abstract data type.
PROGRAMMING TOOLS
First, we must look at the different tools that we have to work with. When you are creating a program you must interact with four main windows. They are the Tool bar,Tool box, Project box, and the Properties window.
TOOL BAR
The tool bar is the bar is at the very top of the editing window. It consists of the dropdown menus: File, Edit, View, Project, Build, Debug, Data, Tools, Window, and Help. Below those options are the “quick buttons”. These buttons, reading from left to right are: New Project, New Form, Open File, Save File, Save All, Cut, Copy, Paste,Undo, Redo, Navigate Backward, Navigate Forward, Solution Configurations, Find,Solution Explorer, Properties, Toolbox, and Class View.

 TOOL BOX
The Tool box contains the tools you use to place various controls on your forms. It
displays all the standard Visual Basic controls plus any custom controls and objects you have added to your project with the Custom Controls dialog box.
There are 47 basic tools in the Toolbox:
Pointer: This is the only item in the Toolbox that doesn't draw a control. It is used to
resize or move a control after it's been drawn on a form.
Label: Used for text that you don't want the user to change, such as a caption under a
graphic.
Link Label: A Hyperlink label
Command Button: Used to create a button that the user can choose to carry out a
command.
Text Box: Used to hold text that the user can either enter or change.
Main Menu: Adds menus under the titles bar of the form. i.e. File, Edit, …
Check Box: Used to create a box that the user can easily choose to indicate if something is true or false, or to display multiple choices when the user can choose more than one.
Radio Button: Used in a group of option buttons to display multiple choices from which the user can choose only one.
Group Box: Typically used to serve as a border for control with similar needs
Picture Box: Used to display graphical images (either decorative or active), as a
container that receives output from graphics methods, or as a container for other
controls.
Panel: Used to host or hold other controls that belong to the same group
Datagrid: Allows users see and edit multiple rows of data simultaneously, also useful for
rapid entry of large amounts of data
List Box: Used to display a list of items from which the user can choose one. The list can
be scrolled if it has more items than can be displayed at one time
Checked List Box: Allows the user to select multiple items in a list by providing a check
box for each item.
Combo Box: Used to draw a combination list box and text box. The user can either
choose an item from the list or enter a value in the text box.
List View: Displays a list of items with icons, similar to Windows explorer.
Tree View: Displays a hierarchy of nodes, like files and folders.
Tab Control: Allows the user to add multiple tabs to a form, like dividers in a notebook.
Date Time Picker: Allows the user to select a single item from a list of dates or times.
Month Calendar: Displays a calendar that allows the user to change months and select a
date
Horizontal Scroll Bar: Used to provide a graphical tool for quickly navigating through a
long list of items or a large amount of information, for indicating the current
position on a scale, or as an input device or indicator of speed or quantity.
Vertical Scroll Bar: Used to provide a graphical tool for quickly navigating through a
long list of items or a large amount of information, for indicating the current position on a scale, or as an input device or indicator of speed or quantity.
Timer: Used to generate timer events at set intervals. This control is invisible at run time.
Splitter: To resize docked controls at runtime.
Domain Up Down: Basically a textbox with two buttons for moving up and down in a
list Numeric Up Down: Same as DomainUpDown, except the list is composed of numbers
and the up and down arrows adjust the value of the control
Track Bar: Also called a slider. Used to move through vast amounts of data, or visually
adjust a number.
Progress Bar: Set to indicate the progress of a process by displaying the status in the
form of small rectangles in a long rectangle.
Rich Text Box: A textbox that uses .rtf format.
Image List: Just like it sounds, a list of images. The list can be navigated by a button that
scrolls through the images
Help Provider: Brings up the help window.
Tool Tip: Used to display text when the user moves the mouse over a control.
Context Menu: Displays a menu of frequently used commands associated with the
selected item
Tool Bar: Allows the programmer to add a toolbar to his form
Status Bar: Used to allow an application to display various information about its status
Notify Icon: Used for processes that run in the background, and most of the time don’t
need an interface with the user. A good example would be virus protection
software.
Open File Dialog: Brings up the window that allows the user to select a file for opening
Save File Dialog: Opens the window that lets the user select the location and name of the
current open file
Font Dialog: Brings up the font selection window
Color Dialog: Allows the user to choose the current font color
Print Dialog: Brings up the typical Windows print menu
Print Preview Dialog: Opens the menu window for Print Preview settings
Print Preview Control: Opens print preview with the default settings
Error Provider: Provides a non-intrusive way of showing that there is an error with the input or in a data set. An exclamation mark in a red square is displayed next to the error
Print Document: Prints the current document with the default printer settings
Page Setup Dialog: Opens the window that allows the user to adjust page settings likeNmargins, headers and footers, and orientation.
PROPERTIES WINDOW
The Properties window contains the list of design-time properties for a selected form,control, class, module, or menu. These properties can be changed at design time, and the Properties window shows each property's current setting. When you select multiple controls, the Properties window contains a list of the properties common to all the selected controls.
The Properties window consists of:
The Object box. Located beneath the title bar, the Object box identifies the currently selected form or the currently selected control on the form. Click the arrow at the right side of the Object box to see a list that includes the current form and all the controls on the form. From the list, choose the current form or a control on the form whose properties you want to change.
The Properties list. This two-column list shows all the properties that can be changed at design time, as well as their current settings. To change a property's setting, select the property name and type or select the new setting. For properties that have predefined settings, you can display the list of settings by clicking the down arrow at the right of the
settings box, or you can cycle through the list of available settings by double-clicking the property name in the left column.
If you don’t know the purpose of a particular property, select it and the text box at the
bottom of the properties window will give you a brief description.
HOW TO BEGIN
When you first start Visual Basic .Net, the tools that we just discussed may or may not be visible. If they are not, make them visible by clicking on VIEW->TOOL BOX, VIEW-
>PROPERTIES WINDOW. Also visible will be a blank form for you to start working with.
Note: You may change the size of the form by clicking on any corner and dragging.
Remember it is just a window like any other.
IMPLEMENTING THE VISUAL STACK PROGRAM

ADDING AN ICON:
To add an Icon to your form’s caption, invoke the Icon property box click once to
activate the “Open” window.
You will probably have to browse to
…\Program Files\Visual Studio .Net\Common7\Graphics\Icons
From here you can choose from several folders of icons.

At this point, the form should be red, have the caption at the top that says, “Visual Stack
by [your name]”, and have the icon of your choice in the top left-hand corner.
Step 2: “Adding objects to our form”
First, we must decide what kind of objects we need for our particular application. We
need labels, text boxes, picture boxes, command button, and menus. Fortunately, the tool
box has all the objects we need for our program. The following figure represents the final
look and feel of our application

Now let us turn our attention to how exactly these components should be added to our
form.
HOW TO ADD:
COMMAND BUTTONS: The command button are: PUSH, POP, PEEK,INITIALIZE, and EXIT
You can go ahead and add all the objects to the form. This is easily done by selecting the
appropriate component from the toolbox and clicking on the form. An objects size can be
changed by clicking on any corner and dragging. Alternatively, you may change the
height and width by entering a number in the appropriate property field.
In the previous version of this tutorial the elements of the stack (Strings) were stored as
an array of Labels. Due to changes in the event model Visual Basic .NET does not
support arrays of controls. Instead, Event Handlers allows the programmer to handle
events from multiple controls. This is a valuable improvement since the same event
handler can be used for more than one type of control. For the purpose of this project, it
makes no sense to create 10 labels and try and refer to them by name. It would be much
simpler to create a ListBox, then add and remove strings as the stack is pushed and
popped.
This is what the form should look like after you have added all the objects without setting
the properties.

Step 3: “Changing the Properties of the controls.”
COMMAND BUTTONS:
For each of the command buttons change these properties:
Text: P&USH, P&OP, P&EEK, &INITIALIZE, and E&XIT....
Font: Microsoft Sans Serif, 9.75pt
Name: cmdPush, cmdPop, cmdPeek, cmd Initialize, cmdExit
By putting an ‘&’ in front of a letter in the Text property of a button creates a shortcut the
user can take advantage of by pressing ALT Key and the underlined letter. This will
activate the object as if was clicked on.

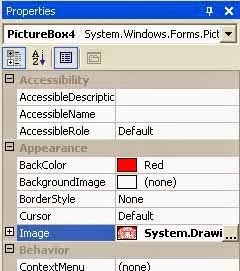
PICTURES:
Adding a picture is just like adding an icon. In the ‘Picture’ property you click on the square and choose an icon for the picture. (Note: Metafiles can be resized and bitmaps can not.)
Choose a picture to put in the upper left and right corners of the form, you can add the
image to the form by simply clicking on the “…” next to the Image property. Then put in
the pictures for the arrows, you may choose any type of arrow you want. I used an icon
located at:
C:\Program Files\Microsoft Visual Studio .NET\Common7\Graphics\icons\arrows
LABELS:
As I mentioned before Visual Basic .NET does not support control arrays, so all of the labels on the form will be simple labels. You can go ahead and change the same properties you changed for each command button using the format “lblXxxxxx” for the name. e.g. lblEdit
LIST BOX:
The list box on this form will be the object that stores the data of the stack. When the user
enters a string in the text box and clicks the Push button, the string will be placed on the
top of the stack. I will show you the code for this later, but for now just rename the object
lstStack. I also changed the BackColor of the List Box to match rest of the form.
MENUS:
Previous versions of Visual Basic contained a utility called Menu Editor, but .NET uses
Menu Objects. If you ever had you use the Menu Editor you will probably find the .NET
approach a big improvement.
The first thing you should do is select Main Menu from the ToolBox, and then click on
the form. This will create a small box on the top of the form that reads “Type Here”.
Whatever you type in that box will become the caption of the menu. I entered “Stack
Information”, and immediately a “Type Here” box appeared next to and below “Stack
Information”. To create a sub-menu, simply type a caption in the lower box. I used
“Definition”, and below that I used “About this Program”.
Selecting one of these menu items will open a new form that displays some text. Later
we will enter the code for opening these new forms, but for now just rename the menus
“mnuDefinition” and “mnuAbout”

When you click on something other than a menu item, the menus will disappear. Clicking on the on the MainMenu1 icon in the component tray at the bottom of the page will bring it back.
To make the menu stick to the form, bring up the Stack form Properties window and
change Menu under the Window Style section. It should read (none), by clicking on the
down arrow you can change it to MainMenu1.

We are now finished with all of the object’s properties; you can change any of them to fit
your style. These are just the basics to get the program started. Colors, font, font sizes,
pictures, and positions are all optional according to your taste.
Click on the Debug menu, and then select Start. Your form will be compiled and an
instance of it will start running. It should look something like this:

Clicking on any of the buttons will have no consequence, but be patient, we will add the
code soon.
ADDING NEW FORMS
We are going to add two new forms to our program. Click Project, and then select Add
Windows Form. This will bring up a new window that displays the different templates.
Click on Windows Form and change the name to Definition.vb.

By clicking Open you will start with a blank form just like you had in the beginning of
this tutorial.
As usual the first thing you should do is rename the form. Changing the name to
frmDefiniton will make the code we write later easier to read.
Since these forms do not do anything other than display some text, we don’t want the
user to be able to minimize or maximize the window, so the properties MaximizeBox
and MinimizeBox should also be false. When the program is executed the upper right
hand controls will not be there.
Another property that you need to be sure to change is the FormBorderStyle, which is
up in the Appearance Section. It needs to be set to any one of the fixed styles. This will
prevent the user from resizing the form by clicking and dragging.
Go ahead and do the same thing for the About This Program form.

ADDING THE CODE TO THE FORMS
Now that we have all the forms prepared, we need to add the underlying code. We will
first start with the About form and the Definition forms. To add code double click on the
object you would like to add code to. In this case we need to add code to the Exit
Buttons. So, go to the About form and double click on the Exit button. When you do this
a programming window should appear with a function all set up and ready to insert code
THE SOURCE CODE:
ABOUT FORM:
EXIT BUTTON:
Private Sub cmdExit_Click(ByVal sender As System.Object, ByVal e As
System.EventArgs) Handles cmdExit.Click
Close() ' unload the current form
End Sub
DEFINITION FORM:
EXIT BUTTON:
Private Sub cmdExit_Click(ByVal sender As System.Object, ByVal e As
System.EventArgs) Handles cmdExit.Click)
Close() ' unload the current form
End Sub
STACK FORM:
EXIT BUTTON:
Private Sub cmdExit_Click(ByVal sender As System.Object, ByVal e As
System.EventArgs) Handles cmdExit.Click
End
End Sub
Now we need to add the code for the objects of the Stack form.
STACK FORM CODE:
OPTION EXPLICIT:
Public Index As Integer
Const STACK_LENGTH = 9
‘Note: This is where all the global variables go. The global variables can be accessed
‘anywhere in the program. Option Explicit also provides strong type checking in VB,
‘and makes the programmer declare any variables before they are used
Private Sub frmStack_Load(ByVal sender As System.Object, ByVal e As
System.EventArgs) Handles MyBase.Load
Index = 0
End Sub
Command Buttons:
PUSH:
Private Sub cmdPush_Click(ByVal sender As System.Object, ByVal e As
System.EventArgs) Handles cmdPush.Click
Push()
End Sub
POP:
Private Sub cmdPop_Click(ByVal sender As System.Object, ByVal e As
System.EventArgs) Handles cmdPop.Click
Pop()
End Sub
PEEK:
Private Sub cmdPeek_Click(ByVal sender As System.Object, ByVal e As
System.EventArgs) Handles cmdPeek.Click
Peek()
End Sub
INITALIZE
Private Sub cmdInitalize_Click(ByVal sender As System.Object, ByVal e As
System.EventArgs) Handles cmdInitalize.Click
Initalize()
End Sub
Text Box Code:
Private Sub txtEnterString_KeyPress(KeyAscii As Integer)
Const ENTERKEY = 13
If KeyAscii = ENTERKEY Then
Push()
End If
End Sub
Push
Public Function Push()
If txtEnterString.Text = "" Then
Beep()
MsgBox("Nothing Entered to Push")
ElseIf Index <= STACK_SIZE Then
lstStack.Items.Insert(0, txtEnterString.Text)
txtEnterString.Text = ""
Index = Index + 1
Else
Beep()
MsgBox("Stack is Full")
End If
End Function
Pop
Public Function Pop()
If Index = 0 Then
Beep()
MsgBox("Stack is Empty")
Else
txtPoppedString.Text = lstStack.Items.Item(0)
lstStack.Items.RemoveAt(0)
Index = Index - 1
End If
End Function
Peek
Public Function Peek()
If Index = 0 Then
MsgBox("Stack is empty")
Else
txtTopString = lstStack.Items.Item(0)
End If
End Function
Initialize
Public Function Initialize()
If Index = 0 Then
Beep()
MsgBox("Stack is Clear")
Else
While Index > 0
lstStack.Items.RemoveAt(0)
Index = Index - 1
End While
End If
txtPoppedString.Text = ""
txtTopString.Text = ""
End Function
Menu_Click
Private Sub mnuDefinition_Click(ByVal sender As System.Object, ByVal e As
System.EventArgs)Handles mnuDefinition.Click
Dim x As frmDefinition = New frmDefinition()
x.Show()
End Sub
Private Sub mnuAbout_Click(ByVal sender As System.Object, ByVal e As
System.EventArgs) Handles mnuAbout.Click
Dim y As frmAbout = New frmAbout()
y.Show()
End Sub
Now you should be able to execute the program. If there are errors in execution then you
may have some typing mistakes. Double check your code and try again. If you have any
questions go to the VB help and search for the control that you are having problems with.
You will get better results if you search for the control using the same spelling that Microsoft did, i.e. mainmenu instead of main menu.
Visual Basic is a programming language that is designed especially for windows programming. This tutorial will step through and demonstrate some of the features of Visual Basic. It will explain most of the tools available for implementing GUI based programs. After introducing the basic facilities and tools provided by Visual Basic, we apply our knowledge to implementing a small VB program. Our program will implement a visual interface for a commonly know “stack” abstract data type.
PROGRAMMING TOOLS
First, we must look at the different tools that we have to work with. When you are creating a program you must interact with four main windows. They are the Tool bar,Tool box, Project box, and the Properties window.
TOOL BAR
The tool bar is the bar is at the very top of the editing window. It consists of the dropdown menus: File, Edit, View, Project, Build, Debug, Data, Tools, Window, and Help. Below those options are the “quick buttons”. These buttons, reading from left to right are: New Project, New Form, Open File, Save File, Save All, Cut, Copy, Paste,Undo, Redo, Navigate Backward, Navigate Forward, Solution Configurations, Find,Solution Explorer, Properties, Toolbox, and Class View.
TOOL BOX The Tool box contains the tools you use to place various controls on your forms. It
displays all the standard Visual Basic controls plus any custom controls and objects you have added to your project with the Custom Controls dialog box.
There are 47 basic tools in the Toolbox:
Pointer: This is the only item in the Toolbox that doesn't draw a control. It is used to
resize or move a control after it's been drawn on a form.
Label: Used for text that you don't want the user to change, such as a caption under a
graphic.
Link Label: A Hyperlink label
Command Button: Used to create a button that the user can choose to carry out a
command.
Text Box: Used to hold text that the user can either enter or change.
Main Menu: Adds menus under the titles bar of the form. i.e. File, Edit, …
Check Box: Used to create a box that the user can easily choose to indicate if something is true or false, or to display multiple choices when the user can choose more than one.
Radio Button: Used in a group of option buttons to display multiple choices from which the user can choose only one.
Group Box: Typically used to serve as a border for control with similar needs
Picture Box: Used to display graphical images (either decorative or active), as a
container that receives output from graphics methods, or as a container for other
controls.
Panel: Used to host or hold other controls that belong to the same group
Datagrid: Allows users see and edit multiple rows of data simultaneously, also useful for
rapid entry of large amounts of data
List Box: Used to display a list of items from which the user can choose one. The list can
be scrolled if it has more items than can be displayed at one time
Checked List Box: Allows the user to select multiple items in a list by providing a check
box for each item.
Combo Box: Used to draw a combination list box and text box. The user can either
choose an item from the list or enter a value in the text box.
List View: Displays a list of items with icons, similar to Windows explorer.
Tree View: Displays a hierarchy of nodes, like files and folders.
Tab Control: Allows the user to add multiple tabs to a form, like dividers in a notebook.
Date Time Picker: Allows the user to select a single item from a list of dates or times.
Month Calendar: Displays a calendar that allows the user to change months and select a
date
Horizontal Scroll Bar: Used to provide a graphical tool for quickly navigating through a
long list of items or a large amount of information, for indicating the current
position on a scale, or as an input device or indicator of speed or quantity.
Vertical Scroll Bar: Used to provide a graphical tool for quickly navigating through a
long list of items or a large amount of information, for indicating the current position on a scale, or as an input device or indicator of speed or quantity.
Timer: Used to generate timer events at set intervals. This control is invisible at run time.
Splitter: To resize docked controls at runtime.
Domain Up Down: Basically a textbox with two buttons for moving up and down in a
list Numeric Up Down: Same as DomainUpDown, except the list is composed of numbers
and the up and down arrows adjust the value of the control
Track Bar: Also called a slider. Used to move through vast amounts of data, or visually
adjust a number.
Progress Bar: Set to indicate the progress of a process by displaying the status in the
form of small rectangles in a long rectangle.
Rich Text Box: A textbox that uses .rtf format.
Image List: Just like it sounds, a list of images. The list can be navigated by a button that
scrolls through the images
Help Provider: Brings up the help window.
Tool Tip: Used to display text when the user moves the mouse over a control.
Context Menu: Displays a menu of frequently used commands associated with the
selected item
Tool Bar: Allows the programmer to add a toolbar to his form
Status Bar: Used to allow an application to display various information about its status
Notify Icon: Used for processes that run in the background, and most of the time don’t
need an interface with the user. A good example would be virus protection
software.
Open File Dialog: Brings up the window that allows the user to select a file for opening
Save File Dialog: Opens the window that lets the user select the location and name of the
current open file
Font Dialog: Brings up the font selection window
Color Dialog: Allows the user to choose the current font color
Print Dialog: Brings up the typical Windows print menu
Print Preview Dialog: Opens the menu window for Print Preview settings
Print Preview Control: Opens print preview with the default settings
Error Provider: Provides a non-intrusive way of showing that there is an error with the input or in a data set. An exclamation mark in a red square is displayed next to the error
Print Document: Prints the current document with the default printer settings
Page Setup Dialog: Opens the window that allows the user to adjust page settings likeNmargins, headers and footers, and orientation.
PROPERTIES WINDOW
The Properties window contains the list of design-time properties for a selected form,control, class, module, or menu. These properties can be changed at design time, and the Properties window shows each property's current setting. When you select multiple controls, the Properties window contains a list of the properties common to all the selected controls.
The Properties window consists of:
The Object box. Located beneath the title bar, the Object box identifies the currently selected form or the currently selected control on the form. Click the arrow at the right side of the Object box to see a list that includes the current form and all the controls on the form. From the list, choose the current form or a control on the form whose properties you want to change.
The Properties list. This two-column list shows all the properties that can be changed at design time, as well as their current settings. To change a property's setting, select the property name and type or select the new setting. For properties that have predefined settings, you can display the list of settings by clicking the down arrow at the right of the
settings box, or you can cycle through the list of available settings by double-clicking the property name in the left column.
If you don’t know the purpose of a particular property, select it and the text box at the
bottom of the properties window will give you a brief description.
HOW TO BEGIN
When you first start Visual Basic .Net, the tools that we just discussed may or may not be visible. If they are not, make them visible by clicking on VIEW->TOOL BOX, VIEW-
>PROPERTIES WINDOW. Also visible will be a blank form for you to start working with.
Note: You may change the size of the form by clicking on any corner and dragging.
Remember it is just a window like any other.
Step 1: “The blank form properties”First, in the properties window you need to change some of the values. You can change the values by double clicking on the property’s name, on the left side of the window, or single clicking, on the right side, in the property’s value box. This will make a down
arrow visible, but not all the properties have this feature, in such cases; you will need to type in the value. If you would like to know what all these properties are the Visual Basic help system will provide adequate explanation. Most of the properties are named well and are easy to understand.
arrow visible, but not all the properties have this feature, in such cases; you will need to type in the value. If you would like to know what all these properties are the Visual Basic help system will provide adequate explanation. Most of the properties are named well and are easy to understand.
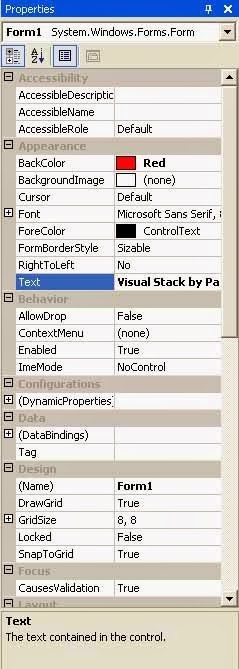
The first property of the Form that you should change is Text. This is that will be displayed on the top bar of the window. “Form1” will be the default setting; you should replace it with an appropriate name for the form. I used “Visual Stack by Paul Michelbrink”
You can customize your form by changing some of the Appearance properties. By
clicking on the down arrow next to BackColor you can change the background color of
the form. Under the System tab you can select traditional Windows colors. I decided to
go with the Red under the Custom tab.
clicking on the down arrow next to BackColor you can change the background color of
the form. Under the System tab you can select traditional Windows colors. I decided to
go with the Red under the Custom tab.
ADDING AN ICON:
To add an Icon to your form’s caption, invoke the Icon property box click once to
activate the “Open” window.
You will probably have to browse to
…\Program Files\Visual Studio .Net\Common7\Graphics\Icons
From here you can choose from several folders of icons.
by [your name]”, and have the icon of your choice in the top left-hand corner.
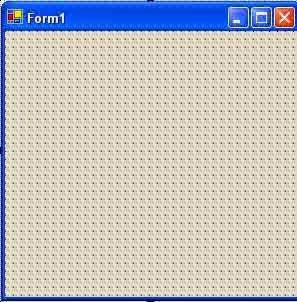
Step 2: “Adding objects to our form”
First, we must decide what kind of objects we need for our particular application. We
need labels, text boxes, picture boxes, command button, and menus. Fortunately, the tool
box has all the objects we need for our program. The following figure represents the final
look and feel of our application
form.
HOW TO ADD:
COMMAND BUTTONS: The command button are: PUSH, POP, PEEK,INITIALIZE, and EXIT
TEXT BOXES: They are the 3 white boxes in the middle of the form
LABELS: The labels are: All the captions above the various controls
PICTURES: The pictures are: the two arrows and the IU Seals.
You can go ahead and add all the objects to the form. This is easily done by selecting the
appropriate component from the toolbox and clicking on the form. An objects size can be
changed by clicking on any corner and dragging. Alternatively, you may change the
height and width by entering a number in the appropriate property field.
In the previous version of this tutorial the elements of the stack (Strings) were stored as
an array of Labels. Due to changes in the event model Visual Basic .NET does not
support arrays of controls. Instead, Event Handlers allows the programmer to handle
events from multiple controls. This is a valuable improvement since the same event
handler can be used for more than one type of control. For the purpose of this project, it
makes no sense to create 10 labels and try and refer to them by name. It would be much
simpler to create a ListBox, then add and remove strings as the stack is pushed and
popped.
This is what the form should look like after you have added all the objects without setting
the properties.
COMMAND BUTTONS:
For each of the command buttons change these properties:
Text: P&USH, P&OP, P&EEK, &INITIALIZE, and E&XIT....
Font: Microsoft Sans Serif, 9.75pt
Name: cmdPush, cmdPop, cmdPeek, cmd Initialize, cmdExit
By putting an ‘&’ in front of a letter in the Text property of a button creates a shortcut the
user can take advantage of by pressing ALT Key and the underlined letter. This will
activate the object as if was clicked on.
Adding a picture is just like adding an icon. In the ‘Picture’ property you click on the square and choose an icon for the picture. (Note: Metafiles can be resized and bitmaps can not.)
Choose a picture to put in the upper left and right corners of the form, you can add the
image to the form by simply clicking on the “…” next to the Image property. Then put in
the pictures for the arrows, you may choose any type of arrow you want. I used an icon
located at:
C:\Program Files\Microsoft Visual Studio .NET\Common7\Graphics\icons\arrows
As I mentioned before Visual Basic .NET does not support control arrays, so all of the labels on the form will be simple labels. You can go ahead and change the same properties you changed for each command button using the format “lblXxxxxx” for the name. e.g. lblEdit
TEXT BOX:
This object that will allow the user to enter a string, we will also use text boxes to display the last popped string, and the string on top of the stack. The string entered will later be pushed onto the stack. You should set all of their Text properties to an empty string, and name them:
txtEnterString
txtPoppedString
txtTopString
LIST BOX:
The list box on this form will be the object that stores the data of the stack. When the user
enters a string in the text box and clicks the Push button, the string will be placed on the
top of the stack. I will show you the code for this later, but for now just rename the object
lstStack. I also changed the BackColor of the List Box to match rest of the form.
MENUS:
Previous versions of Visual Basic contained a utility called Menu Editor, but .NET uses
Menu Objects. If you ever had you use the Menu Editor you will probably find the .NET
approach a big improvement.
The first thing you should do is select Main Menu from the ToolBox, and then click on
the form. This will create a small box on the top of the form that reads “Type Here”.
Whatever you type in that box will become the caption of the menu. I entered “Stack
Information”, and immediately a “Type Here” box appeared next to and below “Stack
Information”. To create a sub-menu, simply type a caption in the lower box. I used
“Definition”, and below that I used “About this Program”.
Selecting one of these menu items will open a new form that displays some text. Later
we will enter the code for opening these new forms, but for now just rename the menus
“mnuDefinition” and “mnuAbout”
When you click on something other than a menu item, the menus will disappear. Clicking on the on the MainMenu1 icon in the component tray at the bottom of the page will bring it back.
To make the menu stick to the form, bring up the Stack form Properties window and
change Menu under the Window Style section. It should read (none), by clicking on the
down arrow you can change it to MainMenu1.
We are now finished with all of the object’s properties; you can change any of them to fit
your style. These are just the basics to get the program started. Colors, font, font sizes,
pictures, and positions are all optional according to your taste.
Click on the Debug menu, and then select Start. Your form will be compiled and an
instance of it will start running. It should look something like this:
Clicking on any of the buttons will have no consequence, but be patient, we will add the
code soon.
ADDING NEW FORMS
We are going to add two new forms to our program. Click Project, and then select Add
Windows Form. This will bring up a new window that displays the different templates.
Click on Windows Form and change the name to Definition.vb.
By clicking Open you will start with a blank form just like you had in the beginning of
this tutorial.
As usual the first thing you should do is rename the form. Changing the name to
frmDefiniton will make the code we write later easier to read.
Note : When creating additional forms for this program you want to be sure to change
the ControlBox property to false because we do not want the user to be able to
click the ‘x’ in the upper right hand corner to exit the form. This is why we are
providing an Exit button.
the ControlBox property to false because we do not want the user to be able to
click the ‘x’ in the upper right hand corner to exit the form. This is why we are
providing an Exit button.
Since these forms do not do anything other than display some text, we don’t want the
user to be able to minimize or maximize the window, so the properties MaximizeBox
and MinimizeBox should also be false. When the program is executed the upper right
hand controls will not be there.
Another property that you need to be sure to change is the FormBorderStyle, which is
up in the Appearance Section. It needs to be set to any one of the fixed styles. This will
prevent the user from resizing the form by clicking and dragging.
Go ahead and do the same thing for the About This Program form.
Now that we have all the forms prepared, we need to add the underlying code. We will
first start with the About form and the Definition forms. To add code double click on the
object you would like to add code to. In this case we need to add code to the Exit
Buttons. So, go to the About form and double click on the Exit button. When you do this
a programming window should appear with a function all set up and ready to insert code
ABOUT FORM:
EXIT BUTTON:
Private Sub cmdExit_Click(ByVal sender As System.Object, ByVal e As
System.EventArgs) Handles cmdExit.Click
Close() ' unload the current form
End Sub
DEFINITION FORM:
EXIT BUTTON:
Private Sub cmdExit_Click(ByVal sender As System.Object, ByVal e As
System.EventArgs) Handles cmdExit.Click)
Close() ' unload the current form
End Sub
STACK FORM:
EXIT BUTTON:
Private Sub cmdExit_Click(ByVal sender As System.Object, ByVal e As
System.EventArgs) Handles cmdExit.Click
End
End Sub
Now we need to add the code for the objects of the Stack form.
STACK FORM CODE:
OPTION EXPLICIT:
Public Index As Integer
Const STACK_LENGTH = 9
‘Note: This is where all the global variables go. The global variables can be accessed
‘anywhere in the program. Option Explicit also provides strong type checking in VB,
‘and makes the programmer declare any variables before they are used
Private Sub frmStack_Load(ByVal sender As System.Object, ByVal e As
System.EventArgs) Handles MyBase.Load
Index = 0
End Sub
Command Buttons:
PUSH:
Private Sub cmdPush_Click(ByVal sender As System.Object, ByVal e As
System.EventArgs) Handles cmdPush.Click
Push()
End Sub
POP:
Private Sub cmdPop_Click(ByVal sender As System.Object, ByVal e As
System.EventArgs) Handles cmdPop.Click
Pop()
End Sub
PEEK:
Private Sub cmdPeek_Click(ByVal sender As System.Object, ByVal e As
System.EventArgs) Handles cmdPeek.Click
Peek()
End Sub
INITALIZE
Private Sub cmdInitalize_Click(ByVal sender As System.Object, ByVal e As
System.EventArgs) Handles cmdInitalize.Click
Initalize()
End Sub
Text Box Code:
Private Sub txtEnterString_KeyPress(KeyAscii As Integer)
Const ENTERKEY = 13
If KeyAscii = ENTERKEY Then
Push()
End If
End Sub
Push
Public Function Push()
If txtEnterString.Text = "" Then
Beep()
MsgBox("Nothing Entered to Push")
ElseIf Index <= STACK_SIZE Then
lstStack.Items.Insert(0, txtEnterString.Text)
txtEnterString.Text = ""
Index = Index + 1
Else
Beep()
MsgBox("Stack is Full")
End If
End Function
Pop
Public Function Pop()
If Index = 0 Then
Beep()
MsgBox("Stack is Empty")
Else
txtPoppedString.Text = lstStack.Items.Item(0)
lstStack.Items.RemoveAt(0)
Index = Index - 1
End If
End Function
Peek
Public Function Peek()
If Index = 0 Then
MsgBox("Stack is empty")
Else
txtTopString = lstStack.Items.Item(0)
End If
End Function
Initialize
Public Function Initialize()
If Index = 0 Then
Beep()
MsgBox("Stack is Clear")
Else
While Index > 0
lstStack.Items.RemoveAt(0)
Index = Index - 1
End While
End If
txtPoppedString.Text = ""
txtTopString.Text = ""
End Function
Menu_Click
Private Sub mnuDefinition_Click(ByVal sender As System.Object, ByVal e As
System.EventArgs)Handles mnuDefinition.Click
Dim x As frmDefinition = New frmDefinition()
x.Show()
End Sub
Private Sub mnuAbout_Click(ByVal sender As System.Object, ByVal e As
System.EventArgs) Handles mnuAbout.Click
Dim y As frmAbout = New frmAbout()
y.Show()
End Sub
Now you should be able to execute the program. If there are errors in execution then you
may have some typing mistakes. Double check your code and try again. If you have any
questions go to the VB help and search for the control that you are having problems with.
You will get better results if you search for the control using the same spelling that Microsoft did, i.e. mainmenu instead of main menu.


